View and Print Production Documents on the Production History Tab
If documents are produced in Eclipse SE Administration, they will automatically be included in Eclipse SE Desktop (unless your administrator produces the documents without the Update Production Table option).
You can view and print production documents from the Production History tab.

|
Note: All users assigned to a case or batch can view production documents; for printing, the Print Images privilege is required.
|
Click the links below to view step-by-step procedures for viewing and printing production history.
To view production documents:
-
Double-click on the Eclipse SE Desktop icon.
-
Select a Client and Case and click Open.
-
Locate and select a record of interest in the documents pane.
-
In the documents pane, click the Production History tab.
-
Select the needed document set from the Production Jobs list. If you have any questions about the listed jobs, contact your administrator.
-
In addition to scrolling through a document page, view documents as follows:
-
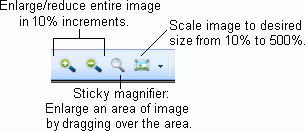
Use the simple  magnification options on the Production History toolbar to view the document.
-
Use preset sizes by right-clicking in image area and selecting Normal, Fit All Ways, or Fit Width.
-
To view pages in a multi-page document, use the  navigation bar in the Production History tab (not the main navigation bar).

|
NOTE: The following procedure applies to printing from a specific production set in the Production History tab. If you need to print from multiple production sets, print from the Image tab as explained in Print Documents or Document Pages.
|
To print documents from the Production History tab:
-
Double-click on the Eclipse SE Desktop icon.
-
Select a Client and Case and click Open.
- On the Case View tab, take one of the following actions:
-
To print a single document: In the Case View or other tab in the documents pane, select the needed record.
-
To print multiple documents: Perform a search or open a Private or Smart Folder that includes the documents matching your printing needs. Make sure the corresponding tab is active in the documents pane.
-
In the Production History tab, select the needed production set.
-
Click  and take one of the following actions in the Documents section of the Print Options tab:
-
If printing a single document: select the current page, a page range, or the entire document. For Current Page Range, enter the beginning and ending page to be printed.
-
If printing multiple documents: select All Documents.
-
In the Printer section, select the printer to be used plus paper size and source (selections depend on printer capabilities).
-
If you are printing to a color printer, select Support Color to print color (including annotation colors) instead of black and white.
-
If needed, complete Include slip sheets in printing (below).
-
If needed, click Calculate Page to find out how many pages will be printed. The total does not include banner or slip sheets.
-
When the print setup is complete, click Print.

|
Note: A defined print setup remains in effect for the current Eclipse SE session. If different settings are needed for subsequent print jobs, check both tabs in the Print dialog box.
|
A slip sheet is a separator page between documents. (If printing a single document, a slip sheet allows you to include a cover sheet with document-specific detail.)
To include slip sheets, complete the following steps.
-
Complete the Print Options tab in the Production History’s Print dialog box as described in the previous procedure, then click the Slip Sheets tab.
-
Select the Print Slip Sheets option.
-
Select the needed paper source (selections depend on printer capabilities).
-
For blank slip sheets, select the Print Blank Page option and skip to step 9.
-
To include document details on the slip sheets, select Endorse Slip Sheet option and click  to open the Select Slip Sheet Endorsements dialog box.
-
To include a custom message, enter it in the Custom Text field.
-
To include data from one or more fields, select the needed field(s). Use the > and < buttons to add or remove fields and Up and Down buttons to organize the order of field data.
Each selection in steps 6 and 7 prints on a separate line, so there are practical considerations to how much content you can include.
-
When finished, click OK.
-
Complete the printing procedure above.
Related Topics
Overview: Document Details Pane

 View Production Documents
 Print Production Documents
 Include Slip Sheets in Printing


 and take one of the following actions in the
  to open the Select Slip Sheet Endorsements dialog box.